Frame Molding Feature Wall Tutorial | Easy & Affordable DIY
30 January 2024

This tutorial is an easy-to-follow tutorial on successfully installing and painting chair rail & frame molding on your own and on a budget, inclusive of tips and tricks to make the job easier. Everything from cutting the frames, attaching the frames, caulking & painting!
If you want to watch the entire tutorial, you can do so below!
https://www.youtube.com/@SallySaraClark
WHAT YOU NEED
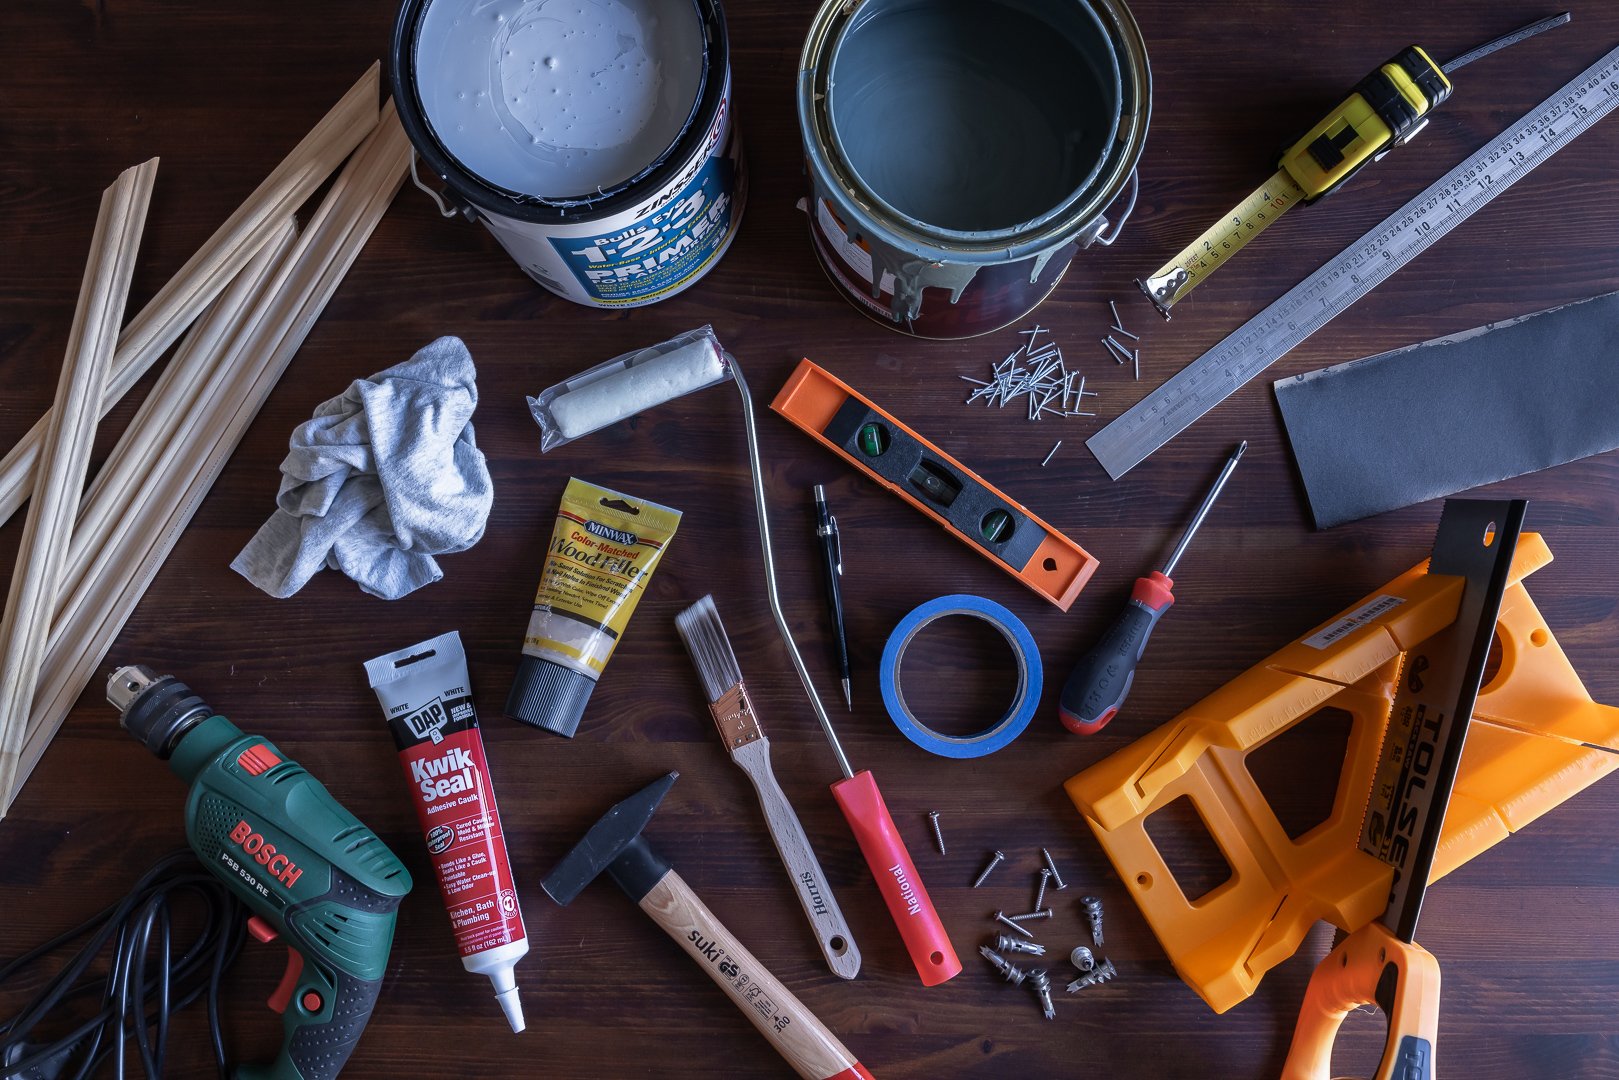
Measuring Tape
Pencil
Rails & Frames of choice
Paint
[If you click on any of the above supplies, you will be taken to the products I used]
FRAME MOLDING LAYOUT CALCULATOR
METHOD
Step 1:
MOOD BOARD
Step 1 is to create a mood board of what you are going for with your frame molding. For this project, I wanted to use frame molding as a feature wall behind the bed to add some style and color. I opted for a simple even frame for the panels and then a nice design for the chair rail to complete the look.

Step 2:
CHECKING THE WALL
Step 2 is to check what wall you’re working with. If it is a solid wall, it’s going to sound dense and feel very hard. If it is gypsum or plasterboard, it is going to sound hollow.
We will be working with plasterboard in this tutorial, thankfully because it is much easier to work with.

Step 3:
MEASURING
Now that you’ve determined what type of wall you have to work with, you want to measure the height and width so that you can calculate the frame sizes you will need. I believe this is personal preference, so go with what looks best to you. There is a frame molding calculator at the start of this post for you. Here are the measurements of my wall:
Tip 1: If you are measuring the wall alone, you can use painter's tape to hold the tape along the wall. If you are wondering why I didn't just measure along the floor, it's because the walls are not always even, and I wanted the exact height from one corner to the other for the chair rail.

Step 4:
MARKING THE WALL
Once you've determined all the measurements, it's time to mark up the wall with a pencil to see where you will be nailing the frame molding panels. Be sure to use a spirit level to make sure your markings are perfectly horizontal and vertical.
Tip 3: The next tip is to use some cheap painters tape to mark out the frame molding so you can get a visual of what your project will look like on the wall before you start nailing in the wooden frames. Luckily, my frame molding will not intersect with an outlet, but if yours does, be sure to measure those frames accordingly.


Step 5:
MARKING THE WOOD
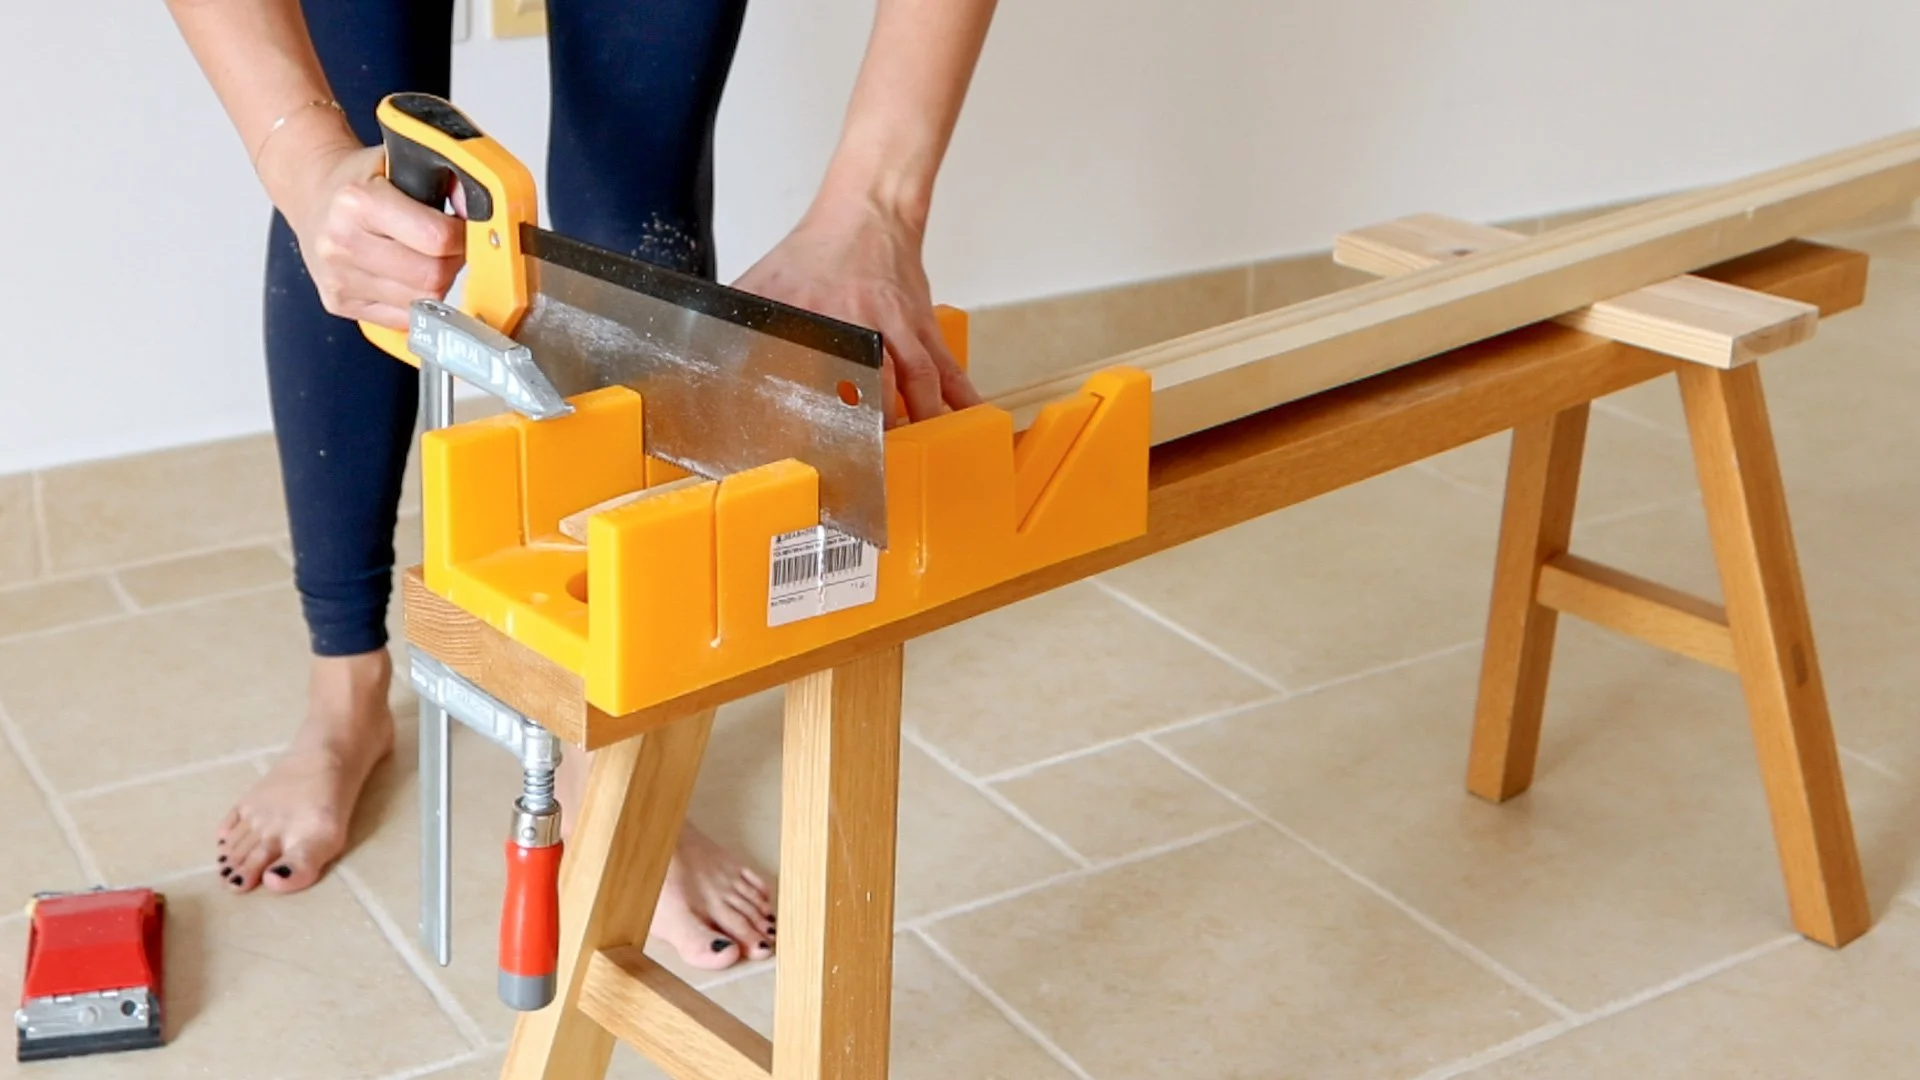
Measure the wooden framing and the chair rail and then cut the wood to size. I used a miter box and saw set that I clamped to an old bench. I purchased this miter set from my local hardware store. Something similar linked [here]. Most tutorials use professional electrical tools for this, but I wanted something that was low cost, easy to use, and available to anyone, especially those who have never done this before, like me. Expensive mitre saw linked here if you want to spend the money for a professional tool [here].


Step 6:
CUTTING THE WOOD
To trim the wood, utilize the miter box to make a 45-degree cut at one end of the frame. Then, at the opposite end, cut another 45-degree angle at a perpendicular angle. The measurements you make on your wood are the longest edge, end to end.

Tip 4: Another tip, cut one piece to size and then use that as your reference piece to cut the rest.

To neaten the edges, sand away rough edges with fine grit sandpaper.
Tip 5: I didn't have this when I was filming the tutorial, but I suggest making your life easier by getting some miter shears. They are not that expensive, and it makes it so much faster cutting the frames. Having said that, you still need the miter box for the chair rail, which we will cut next. Mitre shears linked [here].


The wall is quite long, so I needed two chair rail pieces, I left one at full length and then trimmed the second one so they'd both fit on the wall perfectly.
Tip 6: Use an extra piece of wood to prop up the rail so that it's level on the miter box.


Step 7:
THE CHAIR RAIL
Once the wood is cut to length, mark out 3 hole locations on the thinnest part of the chair rail, one in the middle and one on either end. Then with a spare piece of wood underneath so that you don't drill into your floor, drill the holes in the chair rail for the screws. Check that the holes are the right size by screwing in the screws.
MEASUREMENTS
Now double-check the height of where you want your chair rail to be, place the chair rail on the wall using a spirit level to make sure it is perfectly horizontal at the height you want, and then make a mark on the wall through the holes you created.
Now drill holes into the wall to attach your drywall anchors.
Tip 7: If you are working alone like me, screw the screws into the wood before trying to place it on the wall, so that you aren't trying to juggle screws, screwdrivers, and a chair rail with only 2 hands.
Also, when you are screwing the screws into the anchors make sure your screws go in all the way so they are slightly hidden in the wood, this will help when you cover them up with wood filler.
Most tutorials will tell you to use a brad nailer for this, but my chair rails are quite heavy, so I wanted something that would be more secure on this drywall and using these anchors and screws are much cheaper option than buying a brad nailer. Brad Nailer linked [here].


Step 8:
THE FRAME MOLDING
Now it's time to add the frames, again you can use a brad nailer, but I decided to go for pin nails. Partially nail the pin nails into the frame. This again makes it easier to put on to the wall without having to juggle a leveler, hammer, nails, and then the frame with only 2 hands.
Hammer in the top frame first, making sure to place the frame on the markings you've made but still using a spirit level to make sure the frame is horizontal. Next, add the right and left frames, still using the spirit level as you hammer down to make sure it is properly vertical. Finally, attach the bottom part of the frame. The reason you should go in this order is that it ensures the most even installation.
I didn't use any glue for this because this is a rental property and I wanted to make it easy to remove the frames without tearing down the drywall in the process. Don't worry I have you covered, I will make a removal video for you when I move out of this property or when I get bored of my frame molding and decide to take it down.


Step 9:
CAULK & WOOD FILLER
Caulk your work to ensure a seamless finished look. I used this Kwik seal caulk [linked here], and it made my life so much easier. Whatever caulk you use, make sure it is paintable caulk.
Run a thin line of caulk between the wall and the frame, making sure to smooth it out with your finger and then clean it up with a moist lint-free cloth.
If you make a mess, you can also clean that up straight away with a moist rag. Be sure to smooth it out before it dries because it cannot be sanded into shape once it is dry. I also caulked the chair rail.
This particular caulk took about 2 hrs to dry. Once the caulk dried, I sanded the frame corners a little to tidy them up, and then I used wood filler to neaten the look of the joint.


To do this, apply wood filler [linked here], use your finger to push it in and then with a damp cloth wipe away the excess. I did the same for the holes in the chair rail and some of the little pin nail holes. The wood filler dried within an hour, and then I sanded it to even it out.
I used wood filler instead of caulk for the chair rail joint because wood filler can be sanded, and as mentioned caulk can't be sanded. Once everything is sanded, you want to take a dry clean cloth and wipe away any dust and debris before you move on to the next step.

Step 10:
PAINTING
Now it's time to prime and paint the wall. Before you start, lay down an old sheet or some garbage bags to protect the floors.
I used the Zinsser water-based primer to prep the wood.

Make sure you give it a good shake or stir before you use it.
Tip 8: Instead of messing up your paint tin, add a stick or chopstick in the middle to remove excess paint off your brush.

Then paint the wooden components of your project. I didn't bother to prime the walls because I didn't feel it was necessary.
Also, a little mistake that I made (although not a big deal because my walls are white), but use painter's tape to cover the areas that you don't want painted before you get started with priming.
This includes outlets and even the styled edges of the chair rail.
Now it's time to paint with color.
The color I used for this wall is a water-based interior paint called Balance 6325 by Jotun paints. As mentioned, I am based in Qatar and this is by far my favorite paint brand here because it's affordable and has really nice coverage after 2 coats.
You want to mix the paint well and pour it into a paint tray. Start by using a small brush to paint the frames. Start with one coat and then let it dry for about an hour before applying the second coat to the frames.
As for the brush, I just used whatever brush I had on hand and looking back I probably should have used a more specific brush so that my coats didn't look so streaky, but as you will see after the second coat on the frames, you don't even notice the streaks as long as you paint in the direction of the wood grain.
Now that the wooden frames are done it's time to paint the wall. You could have painted the wall before even applying the frames but I decided doing it last would just make more sense.
I used a small low pile cotton roller for the walls. The reason you want it to be small is so that you can roll between the frames. By the time I finished the first coat on the walls, I was able to start on the second coat because it dried pretty fast.
As mentioned I only needed two coats. Now for the really satisfying part... removing the painter's tape. I removed the painter's tape about 3 hours after I finished painting everything. At this point, the paint is not completely dry but not too wet. Now for the final result in daylight...


FOR THOSE IN QATAR
I purchased my frame molding and chair rail from a hardware store in Souq Haraj. I’ve shared an image of the front of the store below…

This blog post is not sponsored and all items were purchased by me. Some affiliate links are used, which I earn a small commission, which helps support my work at no cost to you.